Experimental Incubator/ei prototype designing: Difference between revisions
No edit summary |
(added link to new docs, wiki is older/incomplete) |
||
| (98 intermediate revisions by 4 users not shown) | |||
| Line 1: | Line 1: | ||
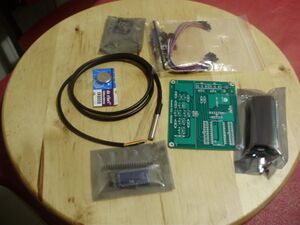
[[Image:Experimental_incubator_kit_4_1600.jpg|thumb|ei Kit "Just"]] | |||
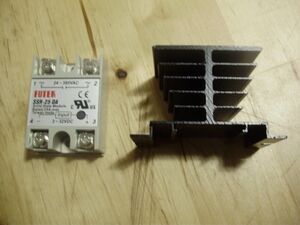
[[Image:Experimental_incubator_ssr_heatsink_1600.jpg|thumb|SSR and heat sink]] | |||
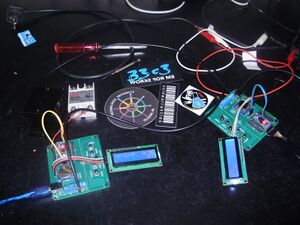
[[Image:Experimental_incubator_complete_voidwarranties_1600_022017.jpg|thumb|Working prototypes assembled at VoidWarranties, February 2017]] | |||
Here you can find info about the development of the experimental incubator (ei)current version 5.0 "Kvas" which we are now working on. There are several improvements compared to the previous version [[4_0_just|4.0 Just]], the fourth generation of the experimental incubator. | |||
The main change is leaving the arduino core behind and switching for the Sonoff device, in particular the [https://www.itead.cc/smart-home/sonoff-th.html Sonoff TH16 model] which should make our life much more easy on many fronts. | |||
=== How to get involved, contact === | |||
Get your kit and let us know! That is the most easy way how to get in and participating. Contact [[User:Algoldor|Algoldor]], [https://wiki.techinc.nl/index.php/User:Justa Justa] or send an email to the [[How_to_get_in_touch|experimental incubator mailing list]]. The total cost is around €25 max. you can buy it easily online, don't forget also the [https://www.aliexpress.com/item/32648158894.html serial to usb 3.3v] so you can upload the code to the device. | |||
* | If you want to get involved, you need help with experimental incubator set up and running or you have some other questions you can get in touch with us: | ||
* at our [[How_to_get_in_touch|experimental incubator mailing list]] | |||
* directly with [[User:Algoldor|Algoldor]] by sending email to algoldor (you know the sign) foodhackingbase.org | |||
* directly with [https://wiki.techinc.nl/index.php/User:Justa Justa] | |||
* pop in our #foodhackingbase channel at oftc network, IRC | |||
=== Soldering and connection === | |||
This needs to be updated because of the switch to Sonoff TH16, however it is going to be way more simple than the previous models. For now, you can check the [https://www.youtube.com/watch?v=d4cro7Kpk_M video here for just short overview]. | |||
=== Schematics === | |||
Well the schematics is something what we need to work on. At the moment lets say that the core of the Sonoff is the [https://en.wikipedia.org/wiki/ESP8266 ESP8266]. | |||
=== Software === | |||
We have to discuss the software sources, there are many out there one of them for example [https://github.com/vitotai/BrewPiLess BrewPiLess], [https://github.com/vitotai/BrewPiLess/tree/master/doc Docs]. | |||
=== Programming === | |||
You will need a [https://www.aliexpress.com/item/32648158894.html serial to usb 3.3v]. | |||
=== Heating&Cooling === | |||
One of the options for heating the incubator could be [https://www.amazon.de/PROFI-LUX-Terrarienheizkabel-IP67-Heizkabel-Frostschutz/dp/B07N7N9LV1/ref=sr_1_3?__mk_de_DE=%C3%85M%C3%85%C5%BD%C3%95%C3%91&crid=33PBEFC9K82BS&keywords=terrarium+heizkabel&qid=1568147205&s=gateway&sprefix=terrarium+heiz%2Caps%2C180&sr=8-3 terrarium heater]. Also [https://www.amazon.de/Reptile-Infrarot-W%C3%A4rmelampe-Reptilien-brooders/dp/B078VY3YG5/ keramik reptile heat emitter] could be used. | |||
=== Currently Run Prototypes === | |||
The prototypes which are currently running the "just" version are listed here: | |||
* [[experimental_incubator_just_la_cherche]], person coordinating [[User:Algoldor|Algoldor]] | |||
=== Temperature probes === | |||
The DS18B20 temperature probes used have PVC shielding; that makes them unsuitable for long time use at temperatures of 100°C or above, although the sensor works up to 125°C. Some sensors are shielded with PTFE cable (more commonly known as Teflon) which is considered food safe to 160°C, so these sensors can be used up to 125°C (max sensor range). Here are some ordering options: | |||
* [https://www.aliexpress.com/item/32849462236.html BME280 Digital Sensor Temperature Humidity Barometric Pressure Sensor Modul] | |||
* [[http://www.dx.com/p/water-proof-ds18b20-temperature-probe-90cm-142889#.WB75j4WcG00 Cheapest found on DX - lead only 90cm, not 100!]] eu 2.26 | |||
* [[http://www.dx.com/p/diy-ds18b20-stainless-steel-temperature-sensor-probe-black-151327#.WB7zzYWcG00 Cheap and tested sensor from DX]] eu 2.53 | |||
* [[http://www.dx.com/p/ds18b20-waterproof-digital-temperature-probe-black-silver-204290#.WB7rNYWcG01 Slightly nicer due to pins on leads]] eu 3.37 | |||
* [[http://www.vanallesenmeer.nl/Temperatuur-1-Wire-Waterdicht-DS18B20 Local source delivers very quickly]] eu 3.25 | |||
* [[https://www.adafruit.com/products/381 Adafruit never cheap]] $9.95 | |||
* [[https://nl.aliexpress.com/store/product/Free-Shipping-1pc-DS18B20-digital-temperature-sensor-PTFE-waterproof-three-core-shielded-cable/342106_1341087517.html?detailNewVersion=&categoryId=523 PTFE version on AliExpress]] $8.50 | |||
* [[http://www.ebay.nl/itm/DS18B20-digital-temperature-sensor-PTFE-waterproof-three-core-shielded-cable-/111959779016 PFTE version on ebay]] eu 12.47 | |||
* [[https://www.adafruit.com/products/642 PTFE version on Adafruit - never cheap]] $14.95 | |||
* [[https://www.kiwi-electronics.nl/hoge-temperatuur-waterbestendige-ds18b20-temperatuur-sensor Local supply of PTFE version]] eu 14.95 | |||
=== Bugs&Issues === | |||
So far no errors because we are not testing yet (2/9/2019). | |||
Latest revision as of 10:41, 11 September 2019
Here you can find info about the development of the experimental incubator (ei)current version 5.0 "Kvas" which we are now working on. There are several improvements compared to the previous version 4.0 Just, the fourth generation of the experimental incubator.
The main change is leaving the arduino core behind and switching for the Sonoff device, in particular the Sonoff TH16 model which should make our life much more easy on many fronts.
How to get involved, contact
Get your kit and let us know! That is the most easy way how to get in and participating. Contact Algoldor, Justa or send an email to the experimental incubator mailing list. The total cost is around €25 max. you can buy it easily online, don't forget also the serial to usb 3.3v so you can upload the code to the device.
If you want to get involved, you need help with experimental incubator set up and running or you have some other questions you can get in touch with us:
- at our experimental incubator mailing list
- directly with Algoldor by sending email to algoldor (you know the sign) foodhackingbase.org
- directly with Justa
- pop in our #foodhackingbase channel at oftc network, IRC
Soldering and connection
This needs to be updated because of the switch to Sonoff TH16, however it is going to be way more simple than the previous models. For now, you can check the video here for just short overview.
Schematics
Well the schematics is something what we need to work on. At the moment lets say that the core of the Sonoff is the ESP8266.
Software
We have to discuss the software sources, there are many out there one of them for example BrewPiLess, Docs.
Programming
You will need a serial to usb 3.3v.
Heating&Cooling
One of the options for heating the incubator could be terrarium heater. Also keramik reptile heat emitter could be used.
Currently Run Prototypes
The prototypes which are currently running the "just" version are listed here:
- experimental_incubator_just_la_cherche, person coordinating Algoldor
Temperature probes
The DS18B20 temperature probes used have PVC shielding; that makes them unsuitable for long time use at temperatures of 100°C or above, although the sensor works up to 125°C. Some sensors are shielded with PTFE cable (more commonly known as Teflon) which is considered food safe to 160°C, so these sensors can be used up to 125°C (max sensor range). Here are some ordering options:
- BME280 Digital Sensor Temperature Humidity Barometric Pressure Sensor Modul
- [Cheapest found on DX - lead only 90cm, not 100!] eu 2.26
- [Cheap and tested sensor from DX] eu 2.53
- [Slightly nicer due to pins on leads] eu 3.37
- [Local source delivers very quickly] eu 3.25
- [Adafruit never cheap] $9.95
- [PTFE version on AliExpress] $8.50
- [PFTE version on ebay] eu 12.47
- [PTFE version on Adafruit - never cheap] $14.95
- [Local supply of PTFE version] eu 14.95
Bugs&Issues
So far no errors because we are not testing yet (2/9/2019).


