Experimental incubator - news
At the moment the most up to date info is at the top of the page, have fun!
Experiemntal Incubator update 9/12/2018
We are considering using Sonoff device for the new generation of the incubator.
Experimental incubator update 4/10/2017
We are at current version four, called "Just" for more info click here. If I Algoldor understand correctly usage of sonoff wireless devices instead of the main arduino control unit which we used till now is suggested by Bigmac and Ikmaak. In general if correct the idea is to switch for easily commercially available modules like the sonoff, peltier heating/cooling units, whole fridges etc? Bigmac also suggests Hackathon at Antwerp around 21th to 29th of October where we could come together and make some prototypes using small fridges gathered at sha2017 and all other necessary components so we can test functional set ups before 34c3 and present it there. Algoldor definitely needs at least one unit so he will be there.
Experimental Incubator Crowdsourcing campaign who is in? 20/8/2014
Crowdsourcing campaign for experimental incubator, late September 1000-1500 EU, who is in? In short I (Algoldor) would like to know who would be ready to chip some time and energy into preparation and running of the crowdsourcing campaign for the Experimental Incubator Project which next prototype we are developing for 31c3? I would suggest to aim for 1000-1500 eu goal flexible campaign so something what we have proven to reach several times already. The goals for the project would be creation of PCB based design (Arnd is working on it), physical printed PCB's based on this design which will be tested allowing temperature measurement and control. There should be also 2-3 fully functional prototypes, probably peltier based which we will demonstrate at the event. It would be nice to have 10-20 kits with the electronic parts (without the heating/cooling elements) available for people involved in this project (so they do not have to pay for everything - time and energy should do) and for price to the people who would like to join - to make it more easy for them. 2-3 fully functional prototypes (control units and heating/cooling systems) to share after the event among the group or for price give away would be great.
Not all of mentioned above has to be done yet (these are suggestions) and it doesn't have to be covered by this campaign only, because at the end of November or during December before CCC we will run another campaign as usually. So what do you think? If interested please get in touch in any manner mentioned here How to get in touch or otherwise.
Sincerely,
FAA
Prototypes running, PCB preparations 6/7/2014 (FAA)
This is just a short update on the progress. The incubators were tested for the past month or so. In both Marcel's and my the cooling is still the issue, there were several problems with the peltiers which should be noted - some of the modules broke down. Marcel suggests to use CPU designed water cooling system on the hot side of the peltier. In my case Algoldor I've been making nattō heating up to 42-43°C for over 32 hours, all going well but I've to report that the heatsink got really hot, bit dangerous I would say with my current establishment, I should rebuild the heating/cooling unit enclosure.
At the moment we are preparing for the PCB version of 2.2 mamut tamna. When Arnd is back from his holiday we hope to progress. I'm thinking about talking to the people from the Seeedstudio in China, Shenzhen if they would be interested in helping with the PCB prototype finalization and hopefully after debugging put it online to their store as a kit. Anyway we will see about it.
That would be all for now, so the plan for the next month and a bit is mostly improving the cooling of the peltiers for better cooling performance and progressing on designing the PCB prototype of 2.2 mamut tamna.
Sincerely from Jeju,
FAA
Two functioning prototypes running for sure 13/6/2014 (FAA)
For the last three weeks or so Marcel and me Algoldor have been testing the device. In Marcel's case the machine is complete, heating, cooling and automatically switching between these two functions (of course detecting the temperature too). In my case I've to switch manual so far, otherwise fine. The info about both projects was updated under the 2.1 Mamut-Tamna prototype which dedicated to the machine which I'm building up here in South Korea. Also the Experimental_Incubator/ei_prototype_designing were updated a bit especially uploading electronic schematics made by Arnd. Just quick conclusion now, both Marcel and me can heat well but the cooling is an issue and it should not be because Lar's prototype which is very similar by power and design (we used it as a blue print) is being able to go down to 8°C with over 25°C outer temperature, we manage max 4-5°C drop compared to the external temperature.
The next step is design of the PCB board prototype which we are starting to discuss with Arnd in lead.
Sincerely from Jeju,
FAA
- Two prototypes updates
Kasiri, South Korea prototype nearly done (FAA) 3/4/2014
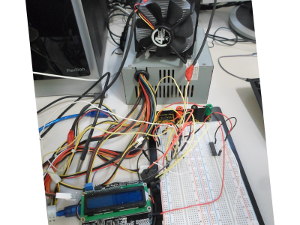
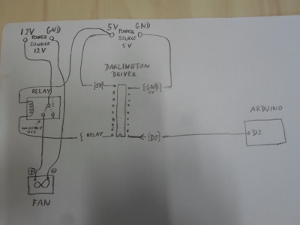
Here are two pictures of the circuit which I'm now testing. It is composed from Arduino (running our latest sketch updated by Marcel), darlington driver (ULN2803) to multiply the signal and the relay (JS1-5V-F) to switch on the fan which runs on 12 V delivered by standard PSU. I'm using the fan instead of the peltier, in this case it is digital 2 instead of cooling function. So far so good, next step is to connect also the peltier (60W), for now it will allow just for heating because I'm missing H-bridge.
Next step is to build up the incubator chamber and set up the hardware in a more lasting manner, but for first few days or week I will probably have things mostly on breadboards.
Sincerely,
FAA
Experimental Incubator Mailing list created!
we have a new mailing list dedicated especially to the experimental incubator project. Many thanks to Steffen who made it happen!
incubator@lists.foodhackingbase.org
If you like to subscribe please send an email to
incubator-subscribe@lists.foodhackingbase.org
and confirm your request when you receive the "confirmation email".
Welcome to this communication media, I will post more tomorrow when I hope most of us are in, but if you could start to think about recapitulating what you have done so far on the variety to this topic related project and summarize it that would be lovely :-)
Sincerely from Jeju,
FAA
PS Please let know the people who you think should know about it, thanks!
Experimental Incubator 30c3 talk video recording
Here is a link to our talk on "Open source experimental incubator build up", call for participation which we gave with Arnd (and with support of Lars) at 30c3. It covers the topic more or less, well have a look if you like
"Production" code uploaded to Github 4/2/2014
A new version has been uploaded to the github which has basic functionality: heat to temp, cool to temp, keep at temp; show time elapsed.
https://github.com/foodhackingbase/incubator
Button function: SELECT resets time; LEFT steps through the modes; UP and DOWN change target temperature; RIGHT stores the settings in EEPROM, so the program will continue after a powerdip.
Code uploaded to Github 19/1/2014
Here is the link to the code which is now uploaded to the Github
https://github.com/foodhackingbase/incubator
thanks to Lars and others from WarpZone for sharing and of course Arnd for the coding.
At the moment the code allows to measure temperature directly after switching on the Arduino, nice and simple. Not sure what else it is ready to do. Next step should be setting up switching the peltier heater on through relay, 39-43C would be fine.
Prototype tested in TechInc 12/1/2014
Here is short youtube video where we tested the Experimental Incubator prototypes which we put together during the same evening in TechInc, many thanks to Arnd for supervision and help!
https://www.youtube.com/watch?v=Z3-HGkqWRvg
What pins belong to what (before 1/2014)
Here is just a link to the info which Arnd made in preparation for 30c3, you can clearly see what pins are doing what
http://wiki.techinc.nl/index.php/Fermentation_controller#An_overview_of_pins_used
Under Arnd's supervision I was able to do all the necessary soldering by myself, putting together therefore one functional prototype, testing it later - it was doable.
An overview of pins
    D0: Serial RX
   D1: Serial TX
   D2: SSR1
   D3: SSR2
   D4: LCD D4
   D5: LCD D5
   D6: LCD D6
   D7: LCD D7
   D8: LCD RS
   D9: LCD 'Enable' (might be optional)
   D10: LCD backlight control (might be made optional)
   D11: One-wire bus 1 (first temp-probe)
   D12: One-wire bus 2 (second temp-probe)
   D13: Free (see note below about LCD and buttons)
   A0: LCD Buttons
   A1: Free
   A2: Free
   A3: Free
   A4: I2C SDA-line for DS1307
   A5: I2C SCL-line for DS1307


